|
|
| How
Do I Make ... ? |
Pitta Bread |
|
Pitta or Pita Bread is very easy to
make and is a daily staple of middle eastern meals.
The recipe is very similar to making bread, but quantities
differ. In native countries Pitta Bread is cooked in
very hot clay ovens, so getting your heat source hot
enough is your only problem - but we have a few good
tips to help you out.
The pitta bread we are making is exactly the same as
bought on UK supermarket shelves, or as sold by your
chip shop for doner kebabs.
Recipe
Source:
 |
Jonno, China Expats, Foshan, China |
|
|
| Websites:China
Expats.com |
| Jonno is a keen chef for friends
and family. He has cooked and interpolated many
dishes over the years, and invented ones of his
own: Most notably 'Splodge', which is vaguely
based upon Italian cuisine |
|
| |
|
|
| Let's get started:- Home made
Pitta Bread |
| Ingredients: |
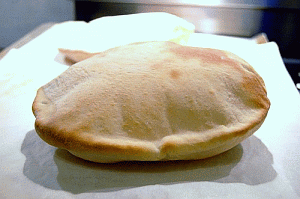 |
1lb bread flour
or
12oz bread flour and 4oz wholemeal flour
1 gill (6oz) warm water
1+1/2 tsp sugar or honey
3 tsp instant yeast or 1/4 oz active dry yeast
(Boy Cooks - one packet should do it)
A little Olive oil
1/2 tsp salt |
| Method |
|
|
|
1. Put the sugar (or honey)
in a warmed bowl and add the water (About 110
degrees F is ideal). Set aside in a warm place
and leave for between 5 and 15 minutes (Depends
on type of yeast and temperature). This should
result in a frothy mixture, which means the yeast
has activated and is working.
2.
Into a mixing bowl add the flour and
a little salt, plus about 1 teaspoon of olive
oil.
Nb: Salt can prevent
the yeast working, so we never, ever, add yeast
to any mixture containing salt, until the yeast
has activated nicely.
3. Make a well in the flour mix,
and slowly pour in the activated yeast water,
stirring with a wooden spoon or spatula until
it becomes unworkable.
Nb: If the mix is too stiff = add some water.
If it is too stodgy = add some flour.
4. Flour a rolling board and
now it's time to get messy! Take the sticky dough
and knead on the surface, adding a little flour
to the board as necessary. This will take between
10 and 15 minutes depending upon how fast you
work. Slower is better!
5. You will end up with a nice
and fairly firm ball of dough that is not sticky
and easily workable and elastic. Smear the outside
lightly with a little olive oil and set aside
to rest in a warm place. Cover with a damp cloth,
or seal inside a freezer bag. Leave for at least
2-hours, and maybe 3 hours. The dough should double
in size.
6. Take the risen dough and divide
into 4 or 6 balls of equal size. Punch-down, flatten
and shape into circles, ovals, or other sharps
ideal for fillings. The dough when rolled should
be a quarter of an inch thick at least. This should
take about one minute.
7. Set
aside to rest for a further 15 minutes minimum,
and up to half an hour is perfect.
Nb:
This second resting is probably the most
important part of preparing pitta breads - as
this ensures air pockets will form whilst cooking!
|
|
|
Cooking and Temperature Problems in China
In UK I would use my circa: 1932 Leisure 72 oven and
preheat this to gas mark 15, placing a large slab of
rock in the bottom (Old gas ovens are hottest at the
bottom) to preheat also. Gas mark 15 used to exist in
household ovens between the wars in UK, but now is only
available within the commercial cookery industry. Whatever
you are using, get it as hot as possible and fully preheat
a really large lump of rock to cook the pitta's on -
granite is best.
Our main problem here is that we need to emulate the
high temperatures used in native mud ovens. China does
not yet even have household ovens, so we need to use
our initiative!
If you have an oven, then wham it up to maximum temperature
and leave for 30 minutes. Placing a thick and flat piece
of stone in the bottom works really well in China -
and whilst marble is often thrown away on the streets,
granite would be better. If you have lived for any time
in China, then you will already have pressed a useful
bit of rock into service. If using a stone, then ensure
that this heats fully within the oven for the entire
30 minutes.
If you do not have an oven, then you can adapt one of
the weird, cylindrical Chinese BBQ thingymagig's that
use rounds of charcoal bricks. These things are about
15 inches high and available outside any reasonably
sized wet market. You will certainly get enough heat
from these, but still need to use a vented rack above
the top outlet, and preheated slab of rock on top of
this as a hearth to cook bread. However, what you do
with the remaining four hours of available heat source
is another problem - so why not cook some fresh kebabs
to put inside the pitta's?
Your worst and most likely option is to have to use
a gas hob. We are struggling with temperature immediately,
so turn it upside down and find the gas regulator on
the pipe near the hob unit or control. This is a circular
ring that adjusts the gas flow. Open this fully - and
if is is lower than before, open it fully the other
way!
Having gotten the gas ring as hot as possible, you now
need to preheat your heaviest grill pan or any solid
lump of iron. You could also just place a thick, large
and flat lump of rock on top instead. Put this to preheat
on the highest setting for about 10 minutes, while you
try and work out how to adapt a wok lid to fit over
your new cooking contraption? This method may not be
hot enough to for the pitta's to form pockets - or it
may just do it!
Cooking
Hopefully we have finally sorted out a heat source that
is hot enough by now, and can move on to the actual
cooking...
Cooking two or three pitta's at a time, simply throw
them onto the very hot cooking stone or iron, and leave
for a few minutes. Your cooking time is generally determined
by the heat available. Regardless of whether this takes
2-minutes or 7 minutes; the pitta is cooked when a few
light brown spots appear on the outside, and the pocket
swells.
Do not overcook, so remove from heat as soon as done
and set aside to rest under a slightly moistened towel
for a few minutes.
Serving
The pitta can be split once cooked, but do benefit from
being reheated - perhaps in a toaster for a minute or
so until they swell into a pocket again. This gives
you time to finish preparing the ingredients of your
dish at leisure, and also crisps the pitta's slightly.
If used immediately, they may not be ideal for pockets
containing sloppy fillings, and may disintegrate. Reheating
solves this small issue.
Storage
Pitta bread can be kept for up to 1-week in the refrigerator,
or for up to 1-month in the freezer. This emulates their
normal use in UK, so you may want to make a batch of
them for freezing every so often. |
| |
Additional Recipes and Information: |
| |
Once you get the hang of this simple
recipe, you can alter it slightly to suit yourself.
Some people add a little crushed and diced garlic, whilst
others prefer to add a lot of garlic and some herbs
(Thyme, Basil, Oregano) and use for dipping instead
of kebabs.
To use for sweet dishes, then add a little extra honey
to the basic mixture separately, and shape into fans
or cones. Add ice cream and fresh fruit for something
completely different. |
| |
Related recipes: Coming soon
|
|
This information is as supplied by ourselves, and ably
supported by our friends and various internet portals. |
|
| Search
this Website |
|
|
| Boy
Cooking |
 |
| Béchamel Related |

|
| Descriptions |
|
|